Old post detected!
This post is roughly 8 years old; originally published on December 13, 2016! The information presented here may be out of date and inaccurate.
Please read this page but do keep its age in mind.
I recently bought the Nextcloud Box. When it came to setting it up I ran into a problem, I only had Raspberry Pi 3 computers available and at the time of writing the microSDHC card provided with the Nextcloud Box only supports the Raspberry Pi 2. Bummer!
Overview
This guide outlines how to use Ubuntu Core on the Raspberry Pi 3 to run Nextcloud provided as a snap from the Ubuntu store.
If you’re not familiar with Ubuntu Core, here’s a quote:
Ubuntu Core is a tiny, transactional version of Ubuntu for IoT devices and large container deployments. It runs a new breed of super-secure, remotely upgradeable Linux app packages known as snaps
After following this guide Ubuntu Core and any installed snaps (and their data) will reside on the SD card and the 1TB hard disk in the Nextcloud box will be available for file storage. This guide explains how to:
- Install and configure Ubuntu Core 16 for the Raspberry Pi 3
- Format the 1TB hard disk in the Nextcloud Box and auto-mount it
- Install the Nextcloud snap and connect the
removable-mediainterface to allow access to the hard disk - Activate and configure the Nextcloud External Storage app so the hard disk can be used to store files
- Optional configuration of Email and HTTPS for Nextcloud
Prepare a microSDHC card
I explained the main steps in this post but you really should read and follow the Get started with a Raspberry Pi 2 or 3 page as it fully explains how to use a desktop computer to download an Ubuntu Core image for your Raspberry Pi 2 or 3 and copy it to an SD card ready to boot.
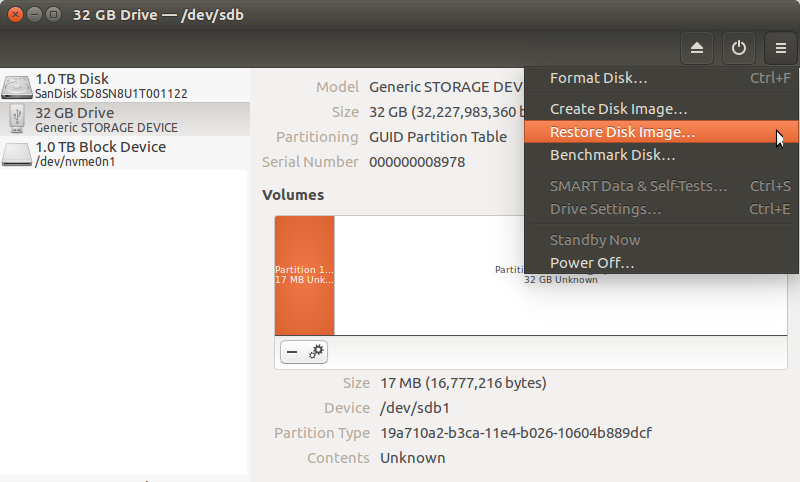
Here’s how to create an Ubuntu Core microSDHC card for the Raspberry Pi 3 using an Ubuntu desktop:
- Download Ubuntu Core 16 image for Raspberry Pi 3
- Insert the microSDHC card into your PC
- Use GNOME Disks and its Restore Disk Image… option, which natively supports XZ compressed images.
- Select your SD card from the panel on the left
- Click the “burger menu” on the right and Select Restore Disk Image…
- Making sure the SD card is still selected, click the Power icon on the right.
- Eject the SD card physically from your PC.
Ubuntu Core first boot
An Ubuntu SSO account is required to setup the first user on Ubuntu Core:
- Start by creating an Ubuntu SSO account
- Import an SSH Key into your Ubuntu SSO account
- Here are instructions to generate an SSH Key
- You’ll need a keyboard and monitor connected to the Raspberry Pi 3 to go complete the first boot process and device configuration.
Insert the Ubuntu Core microSHDC into the Raspberry Pi, which should be in the assembled Nextcloud Box with a keyboard and monitor connected. Plug in the power.
- The system will boot then become ready to configure
- The device will display the prompt “Press enter to configure”
- Press enter then select “Start” to begin configuring your network and an administrator account. Follow the instructions on the screen, you will be asked to configure your network and enter your Ubuntu SSO credentials
- At the end of the process, you will see your credentials to access your Ubuntu Core machine:
This device is registered to <Ubuntu SSO email address>.
Remote access was enabled via authentication with the SSO user <Ubuntu SSO user name>
Public SSH keys were added to the device for remote access.
Login
Once setup is done, you can login to Ubuntu Core using ssh, from a computer on the same network, using the following command:
ssh <Ubuntu SSO user name>@<device IP address>
The user name is your Ubuntu SSO user name.
Reconfiguring network
Should you need to reconfigure the network at a later stage you can do so with:
sudo console-conf
Prepare 1TB hard disk
Log in to your Raspberry Pi 3 running Ubuntu Core via ssh.
ssh <Ubuntu SSO user name>@<device IP address>
Partition and format the Nextcloud Box hard disk
This will create a single partition formatted with the ext4 filesystem.
sudo fdisk /dev/sda
Do the following to create the partition:
Command (m for help): o
Created a new DOS disklabel with disk identifier 0x253fea38.

Command (m for help): n
Partition type
    p   primary (0 primary, 0 extended, 4 free)
    e   extended (container for logical partitions)
Select (default p): p
Partition number (1-4, default 1): 1
First sector (2048-1953458175, default 2048):
Last sector, +sectors or +size{K,M,G,T,P} (2048-1953458175, default 1953458175):

Created a new partition 1 of type 'Linux' and of size 931.5 GiB.

Command (m for help): w
Now format the partition and give it the label data. This label will be used to reference it for mounting later:
sudo mkfs.ext4 -L data /dev/sda1
Automatically mount the partition
Most of the Ubuntu Core root file system is read-only, so it is not
possible to edit /etc/fstab. Therefore we’ll use systemd
to achieve that.
Be aware of one of the systemd.mount pitfalls:
Mount units must be named after the mount point directories they control. Example: the mount point /home/lennart must be configured in a unit file home-lennart.mount.
Yes that’s right! The unit filename must match the mount point path.
Create the media-data.mount unit:
sudo vi /writable/system-data/etc/systemd/system/media-data.mount
Add the following content:
[Unit]
Description=Mount unit for data

[Mount]
What=/dev/disk/by-label/data
Where=/media/data
Type=ext4

[Install]
WantedBy=multi-user.target
Reload systemd, scanning for new or changed units:
sudo systemctl daemon-reload
Start the media-data.mount unit, which will mount the volume, and also
enable it so it will be automatically mounted on boot.
sudo systemctl start media-data.mount
sudo systemctl enable media-data.mount
And just like any other unit, you can view its status using
systemctl status:
sudo systemctl status media-data.mount
Update Ubuntu Core
Make sure Ubuntu Core is up-to-date and reboot.
sudo snap refresh
sudo reboot
After the reboot, make sure /media/data is mounted. If not double
check the steps above.
Install Nextcloud
The Nextcloud snap uses the removable-media interface, which grants
access to /media/*, and requires manual connection:
sudo snap install nextcloud
sudo snap connect nextcloud:removable-media core:removable-media
Browse to the Nextcloud IP address and create the admin user account, for example:
Nextcloud configuration
In the examples below replace nextcloud.local with the IP address or
hostname of your Nextcloud Box and replace example.org with your domain.
External Storage
Enable the External Storge app via:
Configure External Storage app via:
Use these settings:
- Folder name: data
- External storage: Local
- Authentication: None
- Configuration:
/media/data - Available for: All
Configure your outgoing email settings via:
I use Sendgrid for sending email alerts from my servers and devices. These are the settings that work for me:
- Send mode: SMTP
- Encryption: STARTTLS
- From address: [email protected]
- Authentication method: Plain
- Authentication required: Yes
- Server address: smtp.sendgrid.net:587
- Username:
apikey - Password:
theactualapikey
Enabling HTTPS
It is strongly recommend that you use HTTPS if you intend to expose your Nextcloud to the Internet.
First do a test to see if you can install a Let’s Encrypt certificate:
sudo nextcloud.enable-https -d
Answer the questions:
Have you met these requirements? (y/n) y
Please enter an email address (for urgent notices or key recovery): [email protected]
Please enter your domain name(s) (space-separated): nextcloud.example.org
Attempting to obtain certificates... done
Looks like you're ready for HTTPS!
If everything went well, then install the certificate
sudo nextcloud.enable-https
Answer the questions again:
Have you met these requirements? (y/n) y
Please enter an email address (for urgent notices or key recovery): [email protected]
Please enter your domain name(s) (space-separated): nextcloud.example.org
Attempting to obtain certificates... done
Restarting apache... done
If Let’s Encrypt didn’t work for you, you can always use Nextcloud with a self-signed certificate.
sudo nextcloud.enable-https -s
Manual configuration changes
If you need to make any tweaks to the Nextcloud configuration file you can edit it like so:
sudo vi /var/snap/nextcloud/current/nextcloud/config/config.php
If you have manually edited the Nextcloud configuration you may need to restart nextcloud:
sudo snap disable nextcloud
sudo snap enable nextcloud
Conclusion
So there it is, Nextcloud running on Ubuntu Core powered by a Raspberry Pi 3. The performance is reasonable, obviously not stellar, but certainly good enough to move some cloud services for a small family away from the likes of Google and Dropbox. Now go and install some Nextcloud clients for your desktops and devices :-)